
From the manufacturer


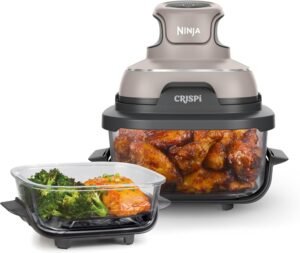 Ninja Crispi® 4-in-1 Portable Glass Air Fryer Cooking System, Mango Clouds
Original price was: $179.99.$17.99Current price is: $17.99.
Ninja Crispi® 4-in-1 Portable Glass Air Fryer Cooking System, Mango Clouds
Original price was: $179.99.$17.99Current price is: $17.99. Magwink PZ300 Magsafe Polarizing Filter 52mm
Price range: $3.99 through $4.99
Magwink PZ300 Magsafe Polarizing Filter 52mm
Price range: $3.99 through $4.99Original price was: $39.99.$8.99Current price is: $8.99.
🎁 Perfect Gift: Great for birthdays, White Elephant, or Father’s Day
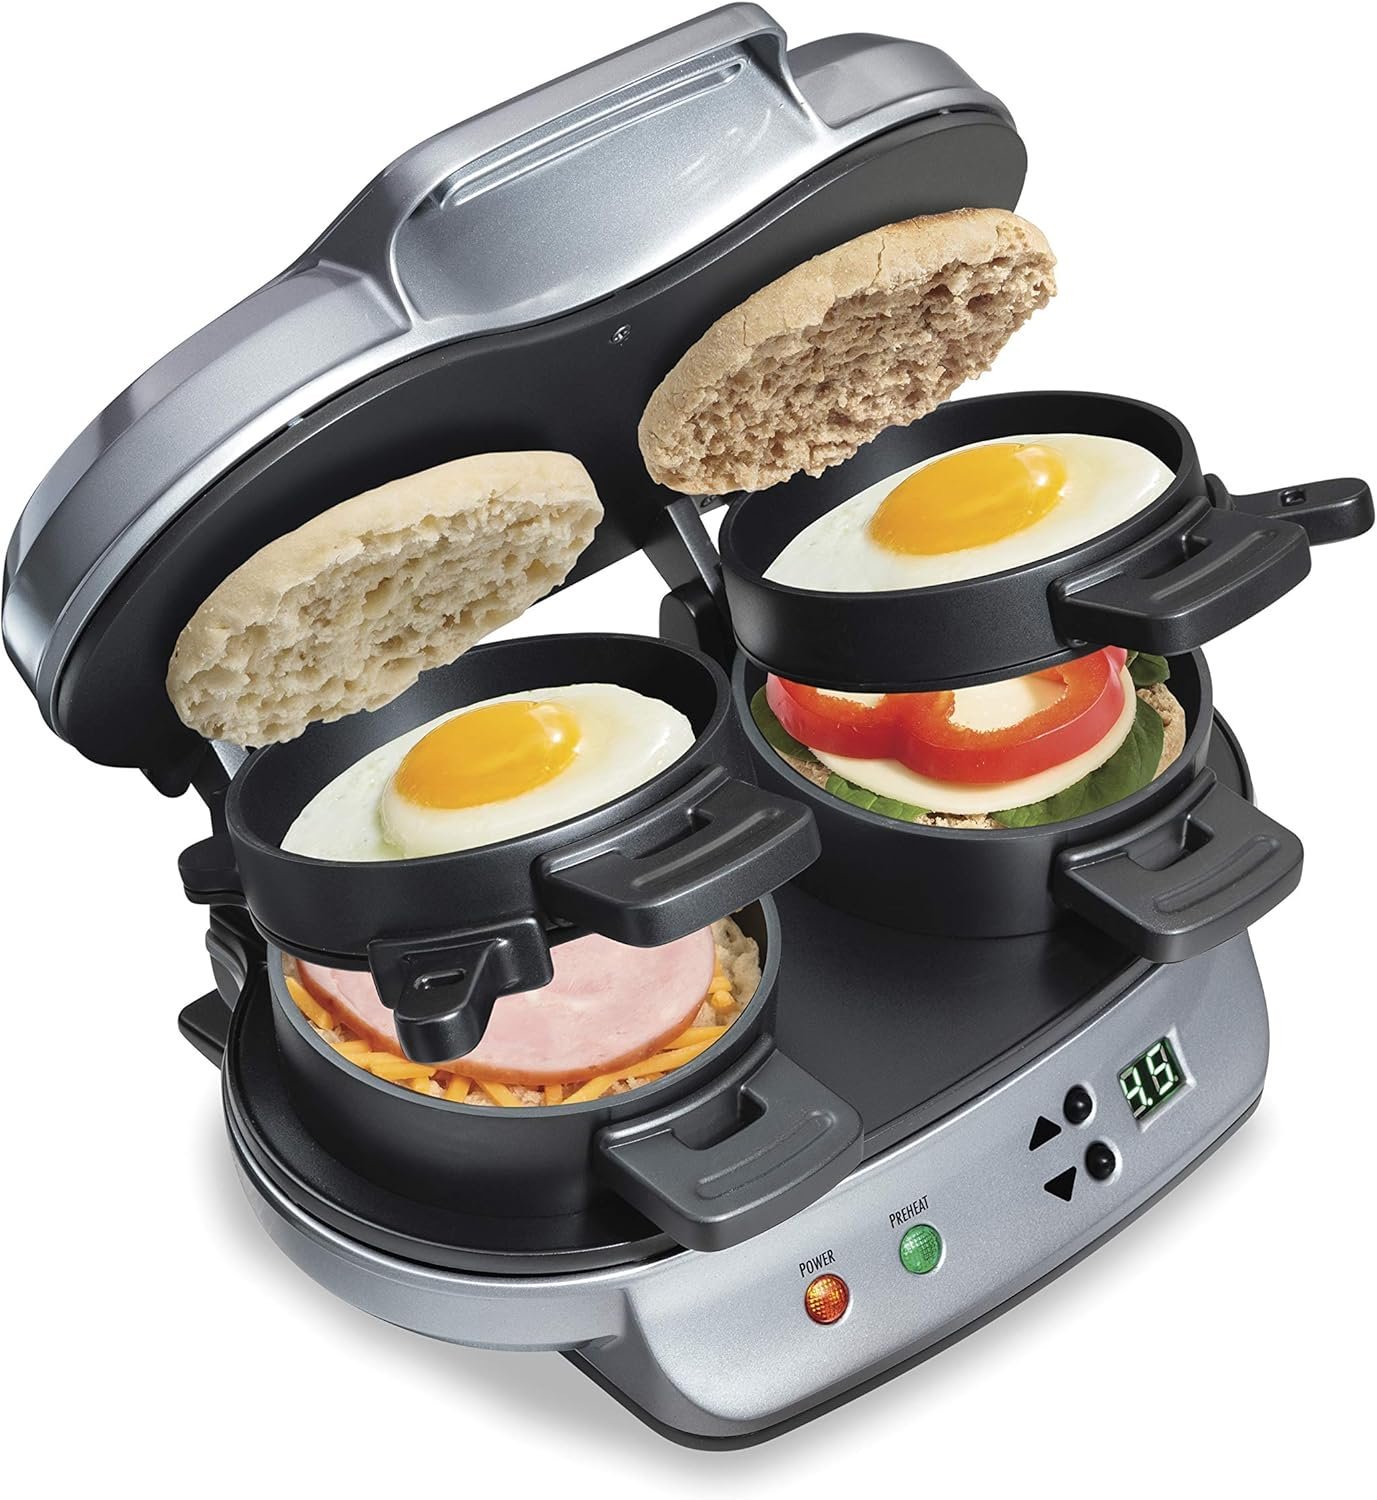
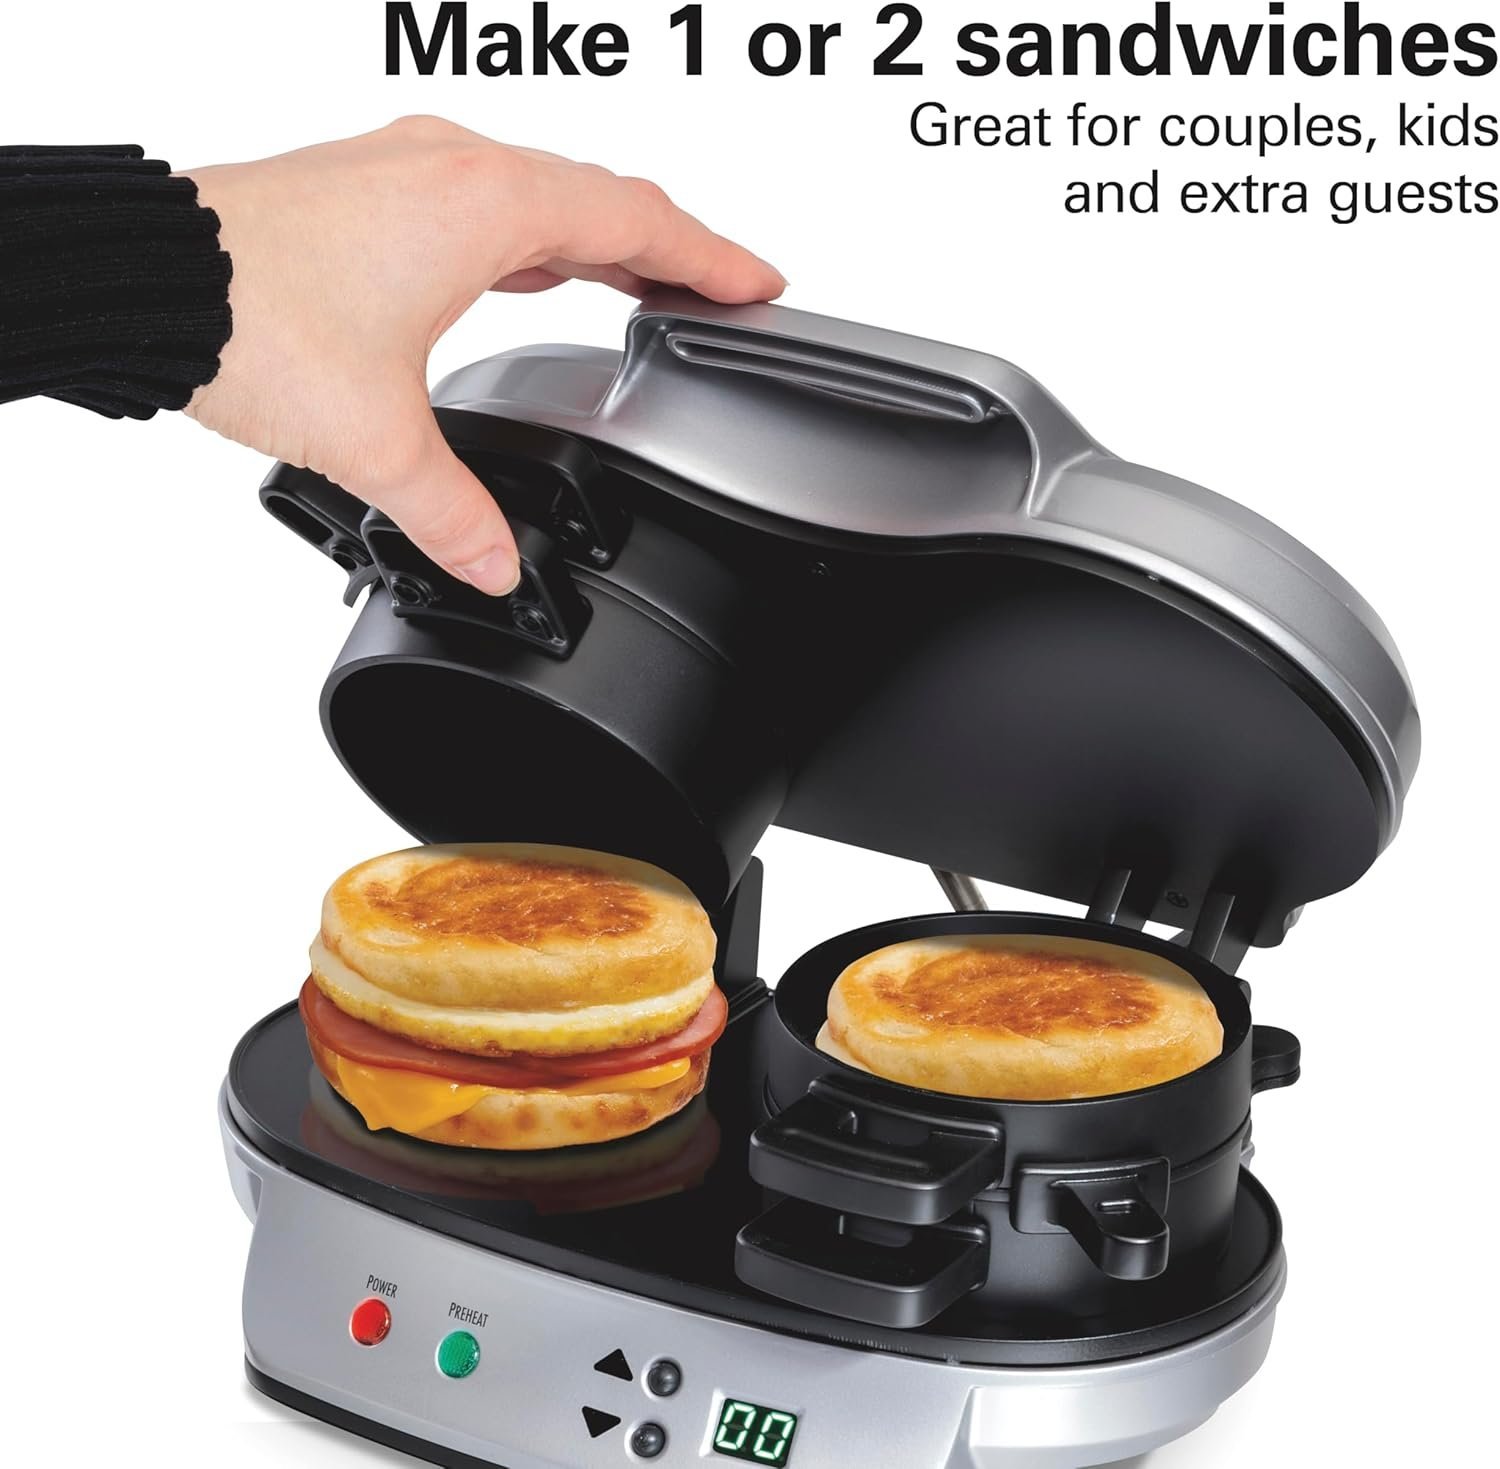
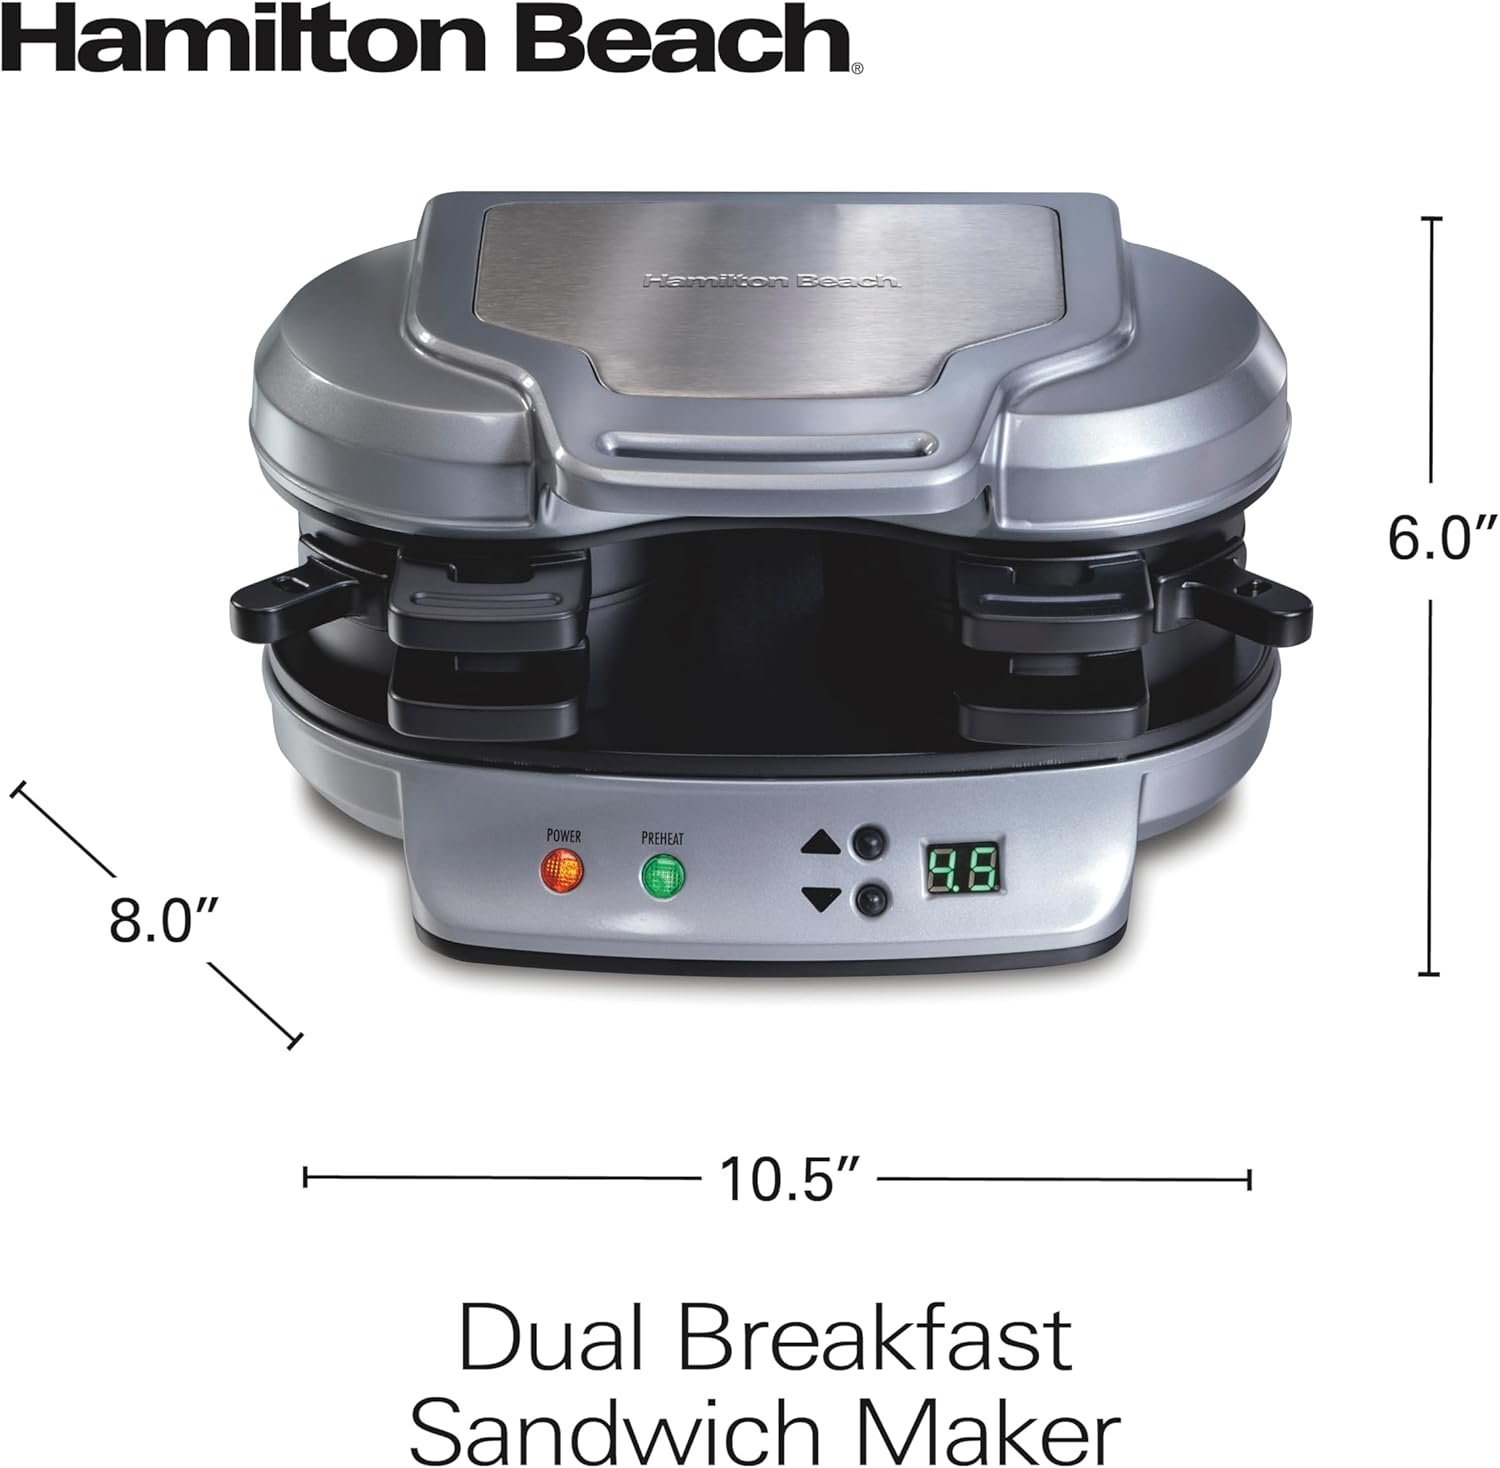
🥪 Makes 1–2 Sandwiches: Ideal for couples, kids, or guests
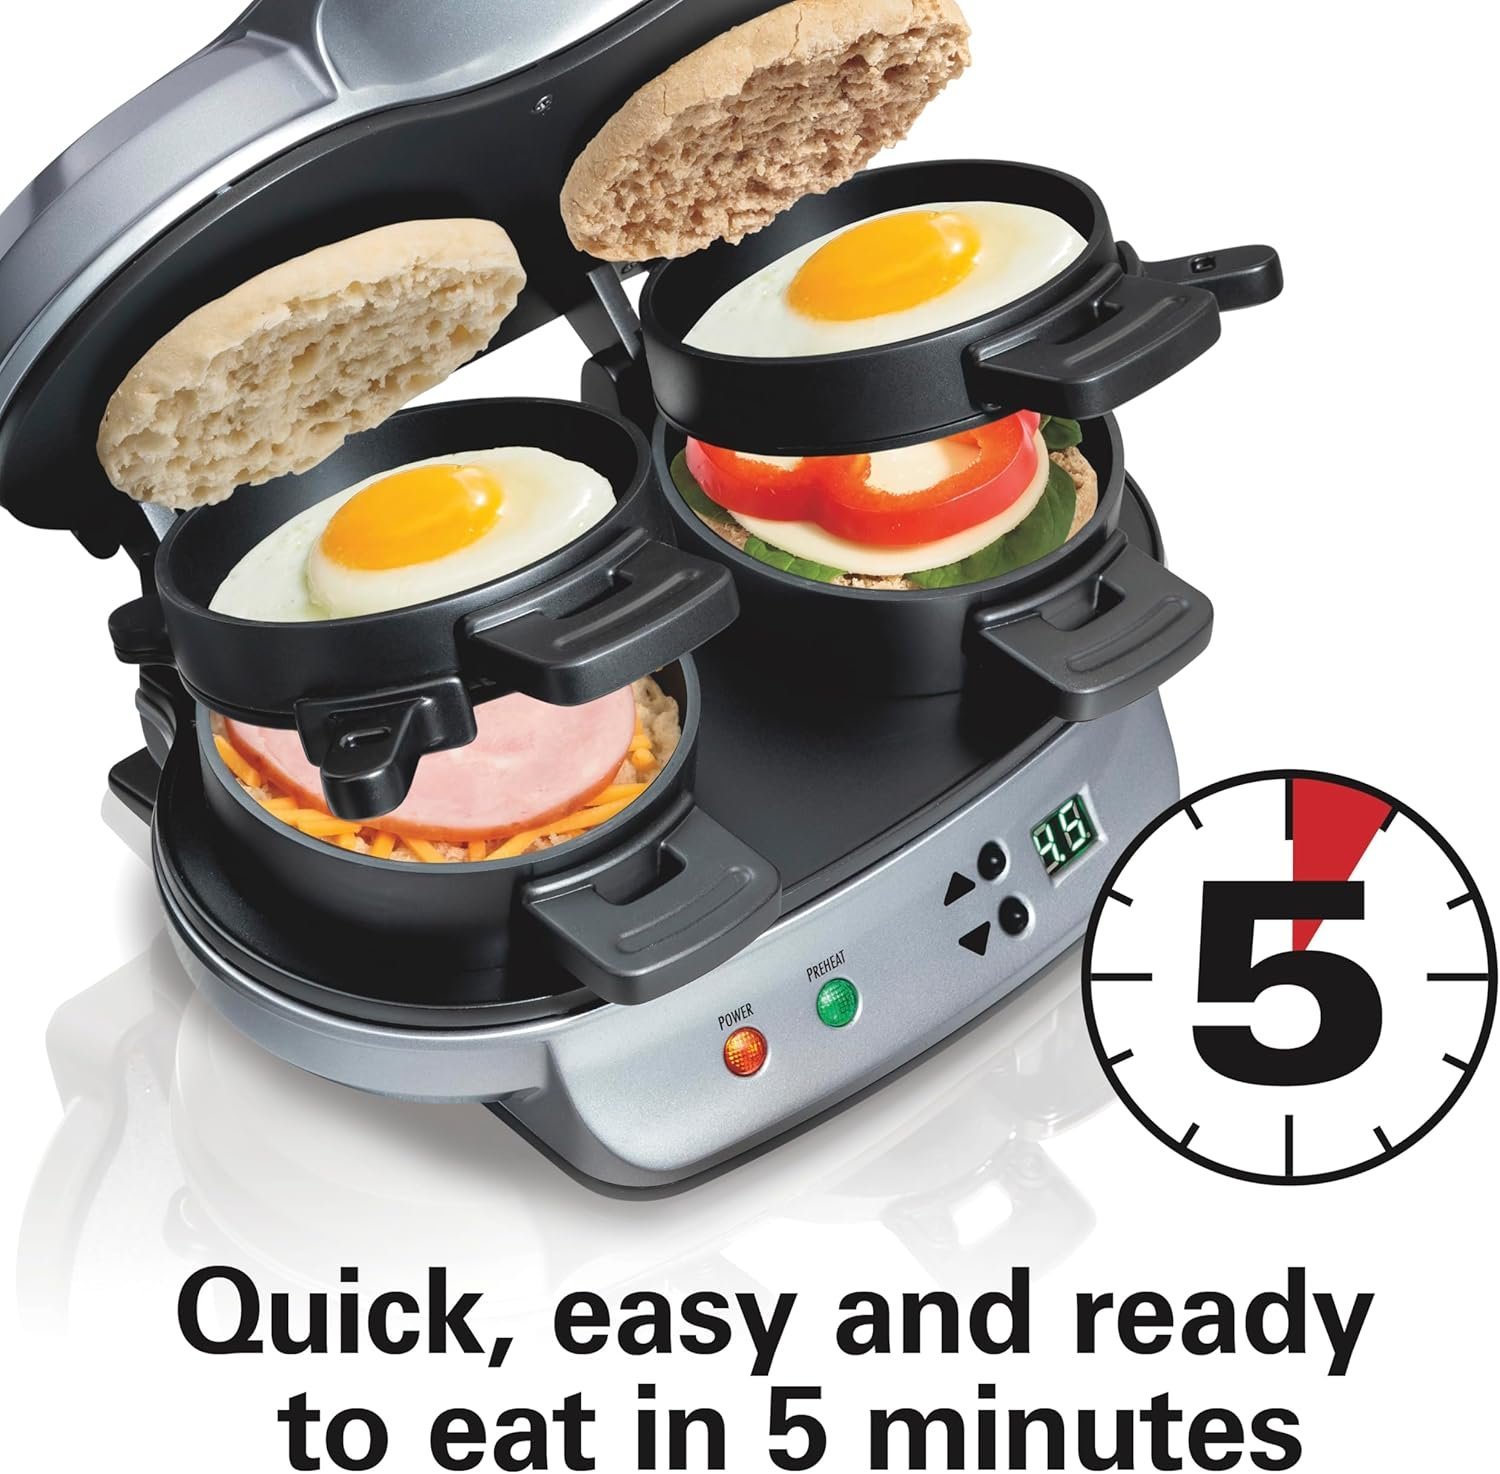
⏱️ Ready in 5 Minutes: Breakfast, lunch, or dinner—fast
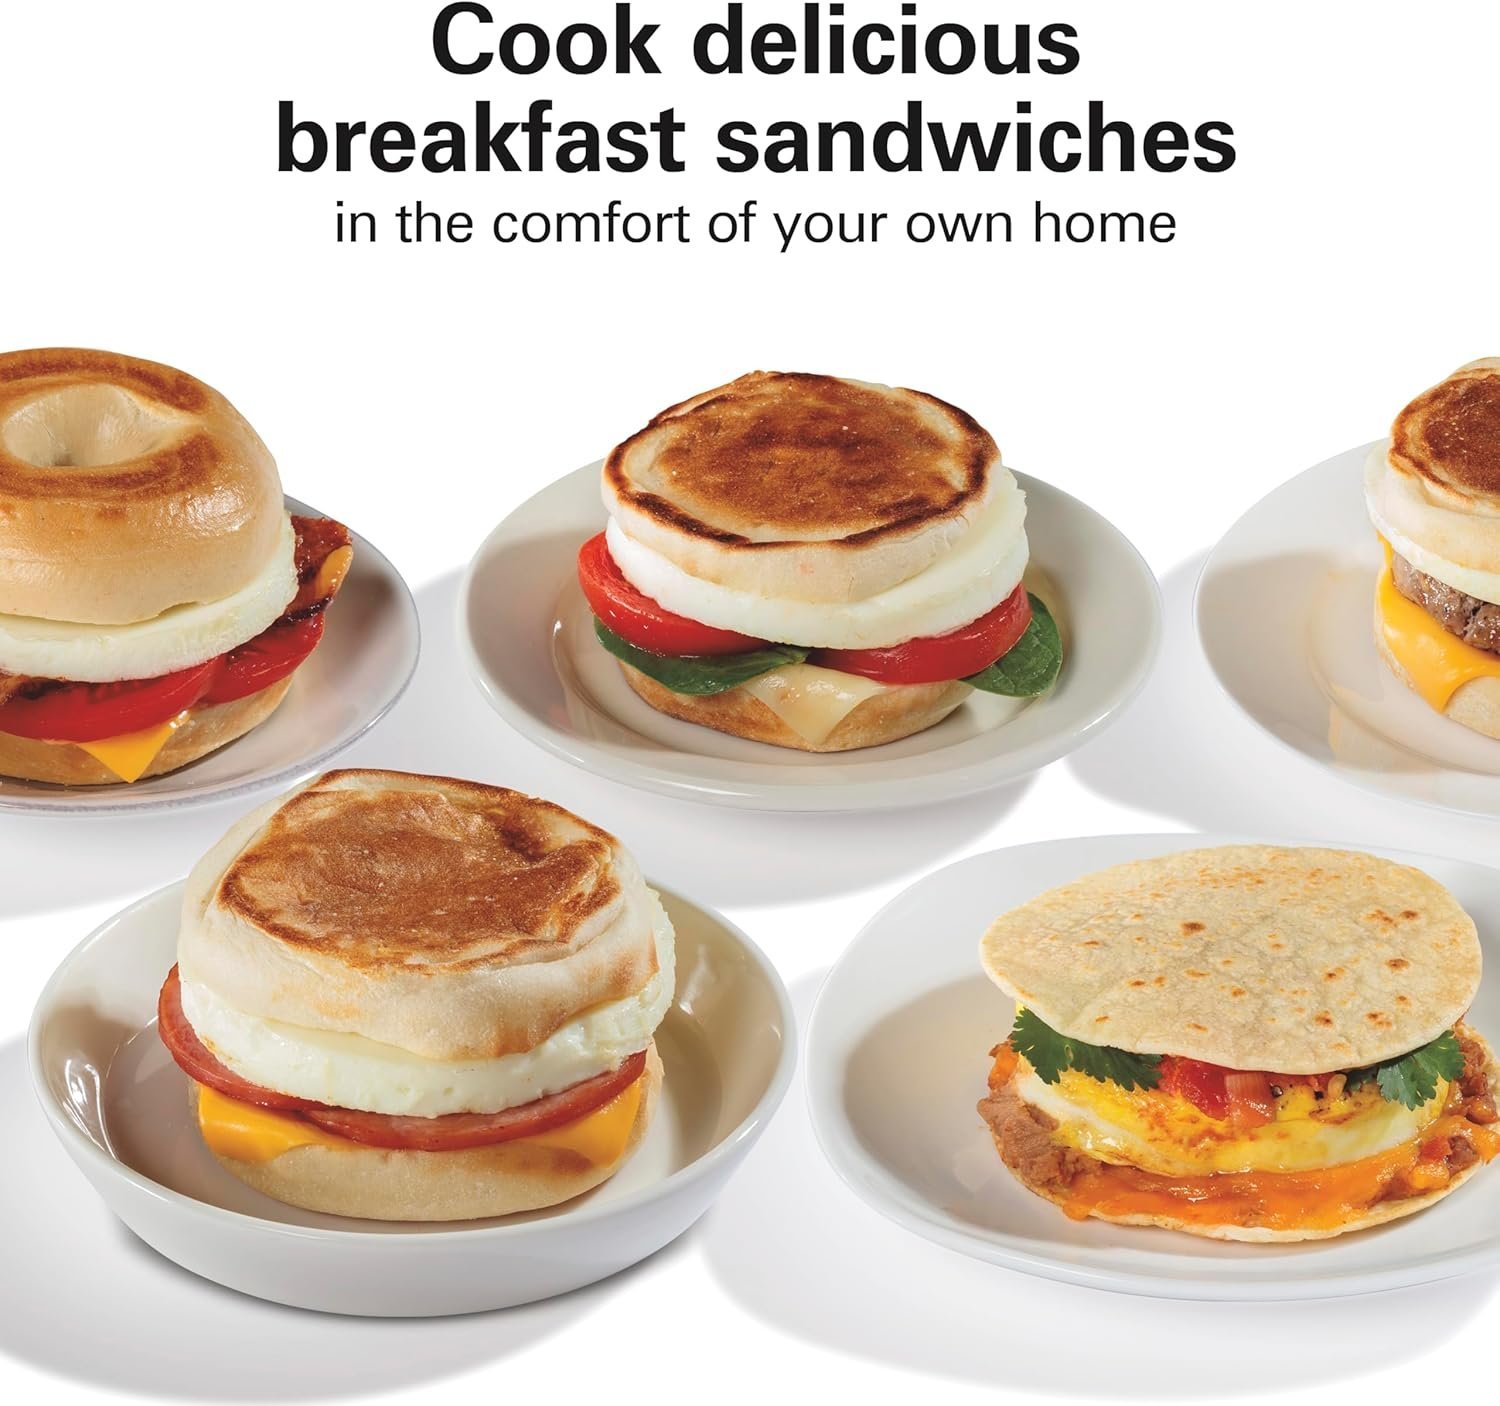
🏠 Homemade Tastes Better: Skip fast food and frozen sandwiches
🥚 Use Fresh Ingredients: Customize bread, cheese, eggs, meats & more
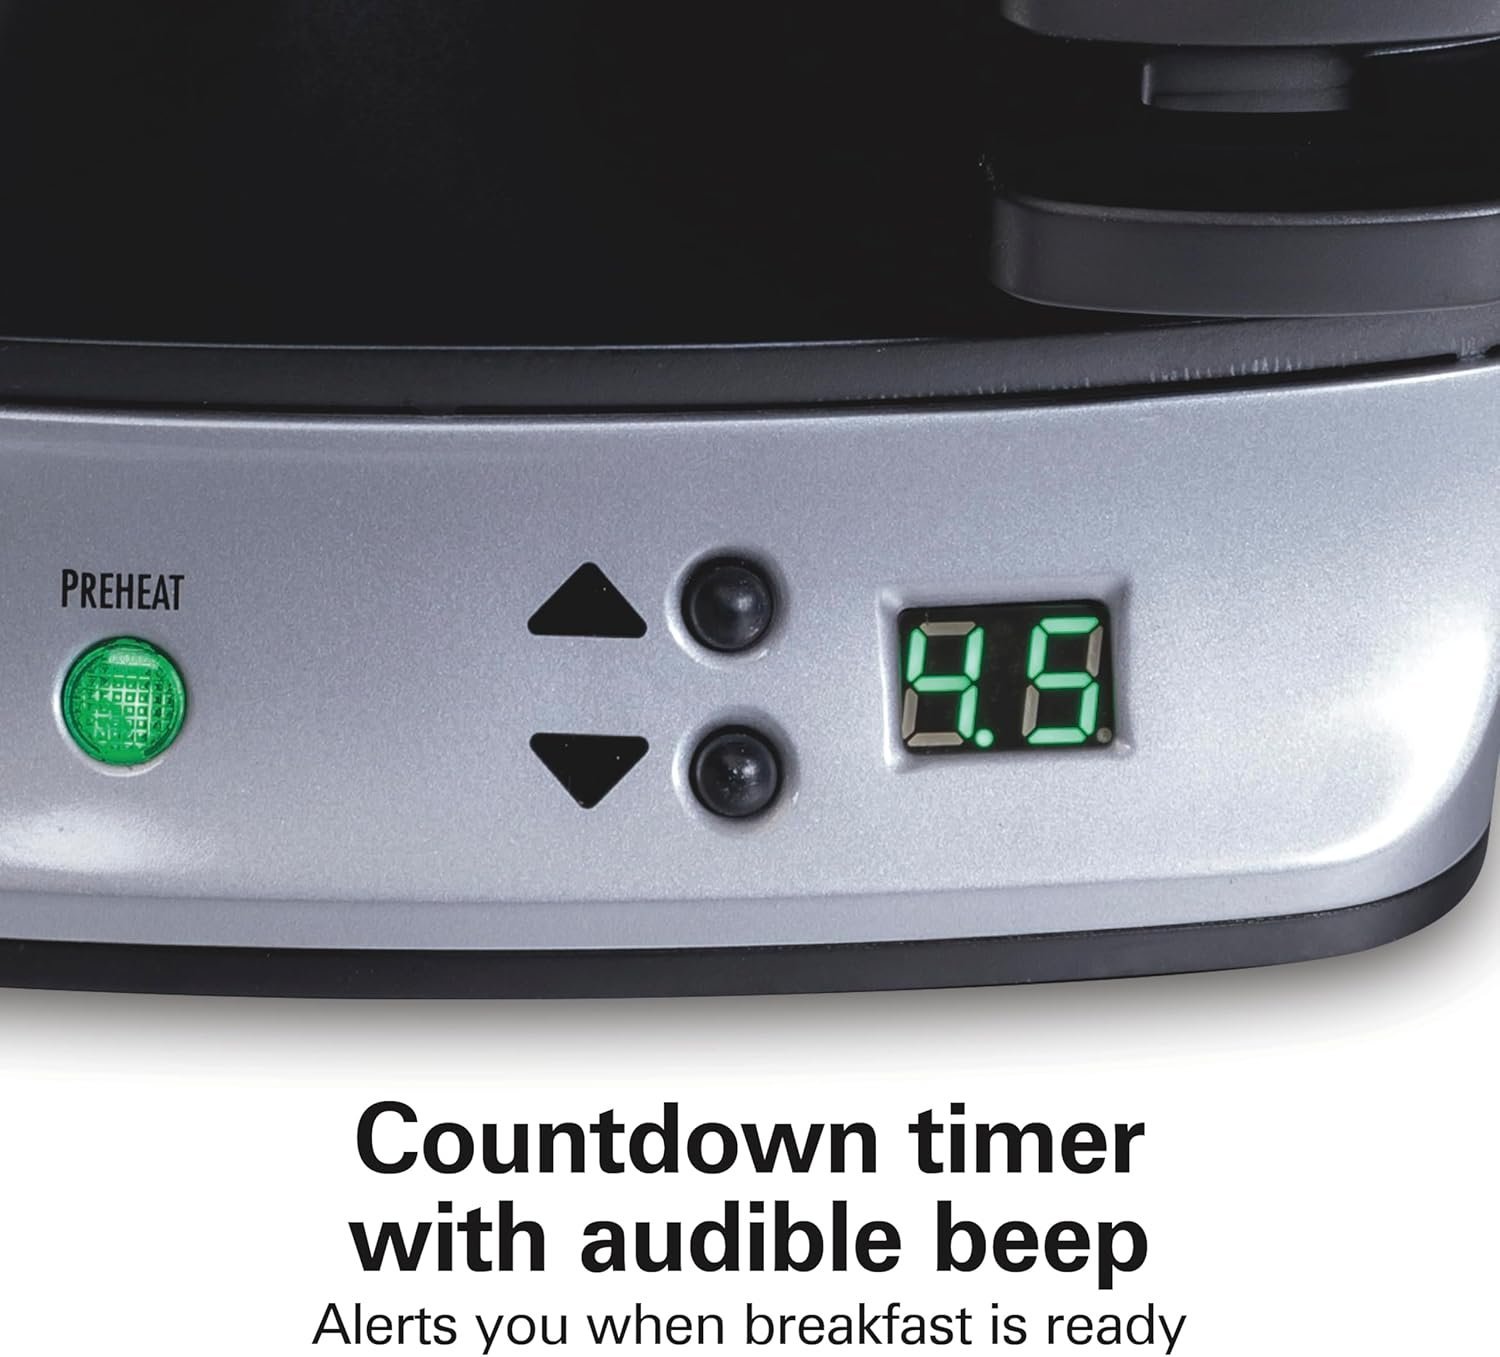
🔔 Countdown Timer Beep: Alerts you when it’s done
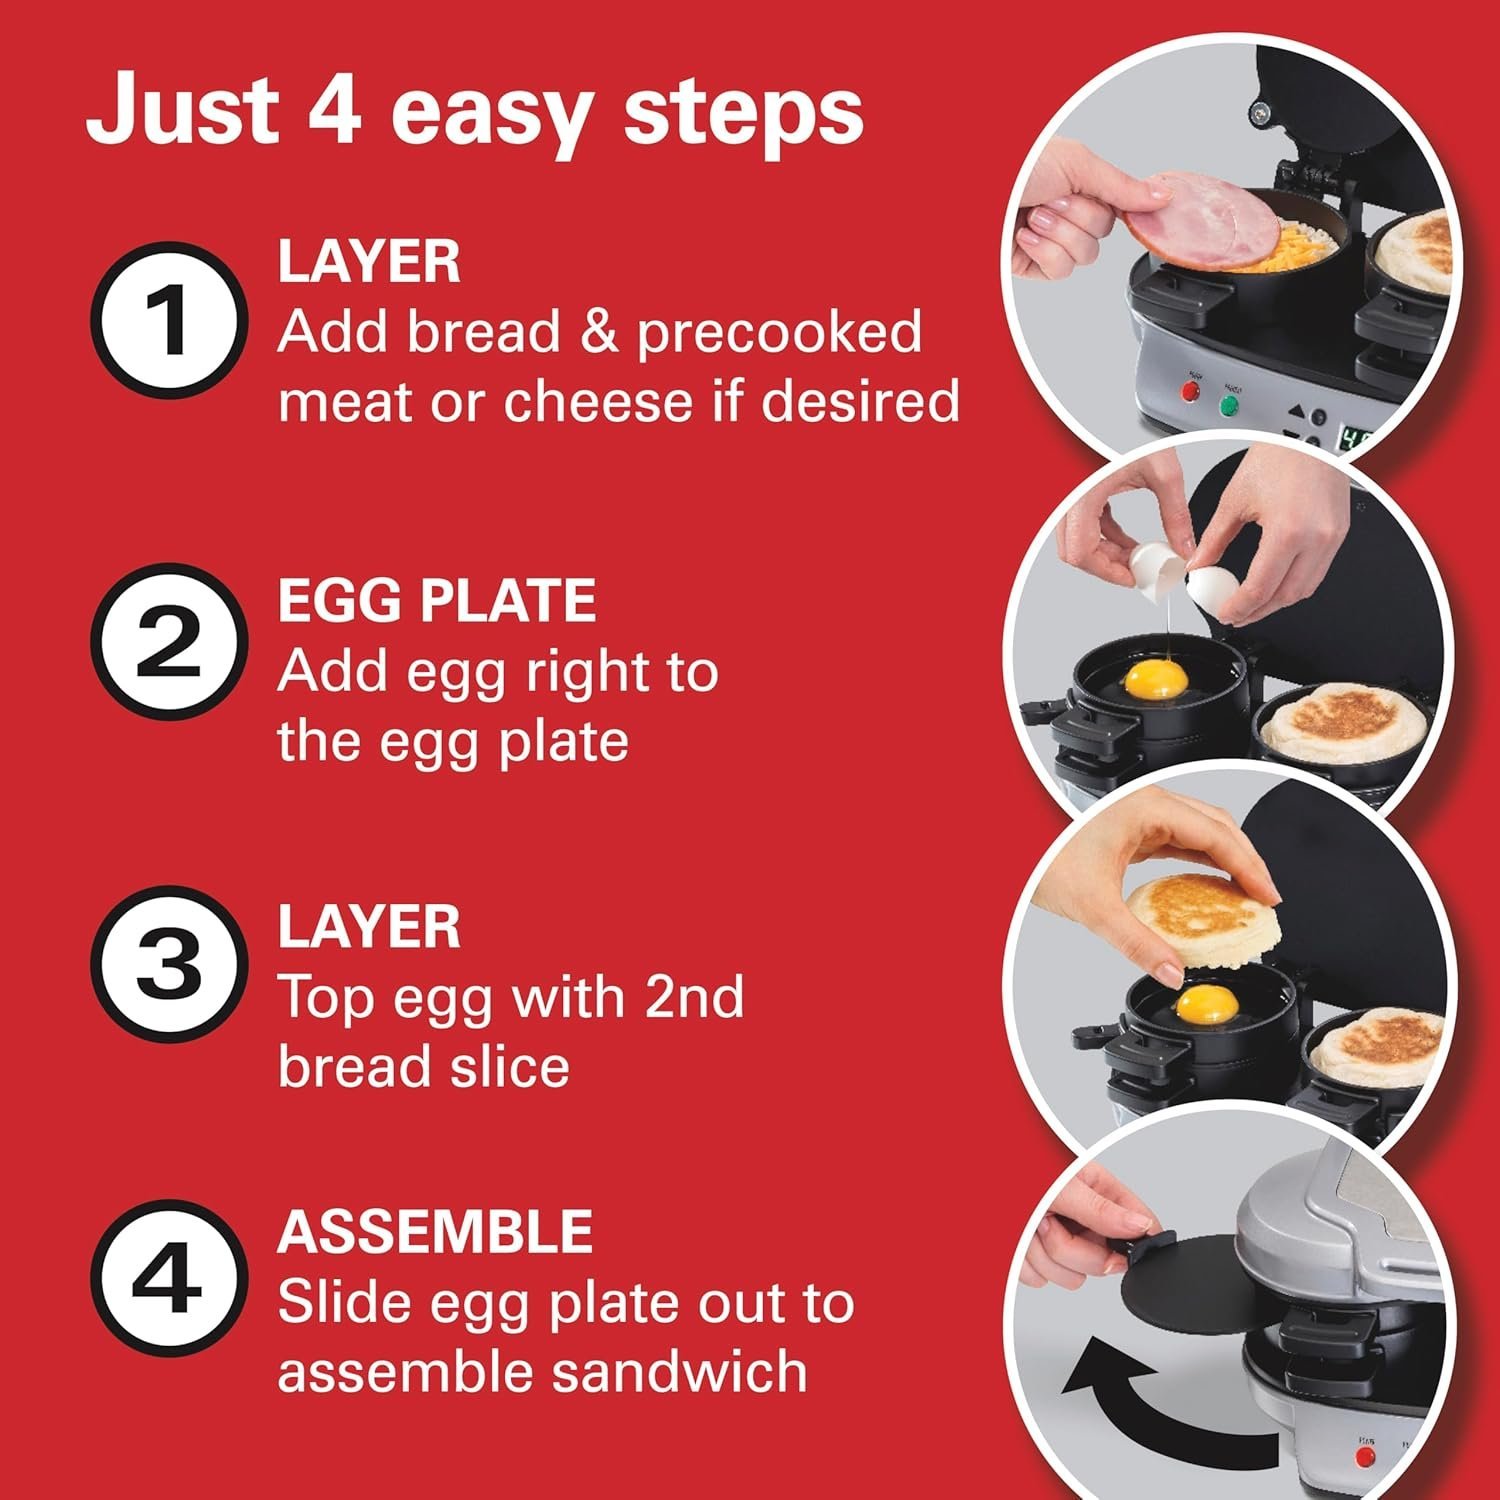
✅ 4 Easy Steps: Simple setup, no leaving home
9 in stock
Kitchen Essentials, Today's Deals
Kitchen Essentials, Today's Deals
$0.01 Deals, Kitchen Essentials, Today's Deals
Kitchen Essentials, Today's Deals
I was a little hesitant and worried that it wouldn't work right but after trying it and making everyone a sandwich at my house I absolutely love it.
I love that it Cooks the eggs and toast the bread all at one time and I have less mess that I have to clean up now with this machine it's really an awesome machine ! Also it's really easy to clean you can wipe it in between each sandwich and it comes clean really easy.
I can’t explain how or why this works so darn well, so I’ll just say I it’s magic. Hamilton Beach knocked it out of the park with this thing.
Insanely easy to use, I’ve made perfect “puck sandwiches” (as I call ‘em) every morning with this machine. It’s no surprise that it has more than 25,000 reviews of 4.6 stars!
Put a tiny amount of oil or cooking spray on the plates and rings, plug it in, the green light shows when it’s ready. Drop the bottom half of the muffin in the lower ring, top with some cheese, then a slice of Canadian bacon or your favorite crispy strip bacon, then drop the next set of rings down and pour in your lightly scrambled egg, drop the top half of the muffin (yeah, on top of the egg goo), drop the lid, set the timer for 5 minutes. PERFECT EVERY TIME.
It’s super easy to clean, too.
This may be the greatest kitchen appliance I’ve ever owned! 😄
The kids and I absolutely love this Hamilton Beach breakfast sandwich maker! It’s super fast, easy to use, and even easier to clean. The sandwiches come out delicious every time, and there are so many different recipes you can try. We’ve made ham, egg, and cheese sandwiches and wrapped them up for quick breakfasts later in the microwave. We can’t wait to experiment with apple cider donuts, sausage and egg, and even mini bagel sandwiches. Perfect for busy mornings and fun to use together!
But my wife and I like breakfast sandwiches and this machine makes two at a time, which is better than using my tiny egg skillet, so I decided to give it a shot. After using it several times, my original reaction has been confirmed, but I'm still happy I have it, and I'm assigning 5 stars because it is a well-made product that performs exactly as advertised.
As others have stated, I'm not a fan of the manufacturer's recommended process of plopping everything into the preheated machine (including placing the top of the English muffin onto the raw egg) and setting it to cook for 5 minutes. Rather, I prefer to cook just the egg for a while, and then add everything else. The total cook time is still 5 minutes, the upper muffin hasn't soaked up a bunch of the egg, and the cheese (which should be placed directly onto the lower muffin half, not on top of the meat!) is nicely melted without running off the sides of the sandwich.
Cleanup is very easy, as advertised (if it wasn't, we would already have written this machine off and tossed it into a closet).
The resulting food quality is quite good ... the muffins are a little chewy compared to toasting them, but it's a reasonable trade-off to get the cheese nicely melted and everything heated properly without getting out other appliances or pans.
I place the top piece of the muffin on the bottom. I use a small condiment dish to cut the slice of cheese and a piece of turkey ham into a circle, to place on it. (Makes it a perfect fit). Then in the next layer, I crack the egg, break the yoke, and add the edges left from the cut cheese and turkey ham. I put the lid down and start the timer. After one minute, I open it up and place the other piece of muffin on top. This helps keep the muffin from absorbing the egg. When the timer goes off, the egg muffin comes out perfect. Each layer is the perfect thickness, and they look way nicer than the ones I used to buy at a fast food place.
I plan on trying other things in this sandwich maker. I am pleased with this purchase and would recommend it to others.
Still, I was skeptical since there are so many appliances available to accomplish specific tasks that can be done without having to store another appliance. I tried this sandwich maker for the first time tonight, and I have to say I was impressed with the results, but have ideas for improvements I will explain later.
Tonight, I made two sets of sandwiches. For the first set, I precooked breakfast sausage patties, did not toast the English muffins and did not butter them. I diced onions, green peppers, and tomatoes that were added on top of the egg for cooking, and used Monterey/jack cheese. So, after the preheat, put in the bottom muffin, cheese on top, and then the sausage patty. Closed the level for the egg, added the egg, diced onion, diced green pepper, and diced tomato, and then topped with the English muffin. For the second set, I toasted the English muffin on a bagel setting and buttered both halves. I put the cheese on the bottom toasted and buttered muffin, and diced ham on top of the cheese instead of a sausage patty. I cooked both sets for 5.5 minutes and allowed the cooker to preheat after the first set.
Both sets of sandwiches were good, but what I found was:
1) Toasting and buttering of the English muffin really didn't make much of a difference other than the outer side of the muffin was browner and the cheese was a bit fried.
2) The egg on both sandwiches was negligible. It seemed to be absorbed by the upper muffin.
I do tend to challenge appliances to the limit and have ideas I will try next time. Although the instructions say to limit the egg size to 1 medium to large egg. I used an x-large egg for all sandwiches and still had plenty of room after adding the diced onion, bell pepper, and tomato. I plan to try using two eggs since there was no problem adding the diced veggies. I think a visible layer of egg may be better with more egg. In addition, I will try letting the egg set before putting the top muffin on top. By putting the muffin on top of the raw egg, the muffin absorbed part of the egg, hence no noticeable layer of egg. Next time, I won't bother toasting the muffins since it was toasted fine in the cooker, and buttering the muffins only added more fat and no benefit.
In conclusion, I believe this cooker is well worth the price as it saves time in making breakfast sandwiches and does a good job in making them. This is one of the appliances that does not have to be limited to the intended use. The breads you use and the ingredients in the sandwiches are left to your imagination. I am still experimenting, and will update this review when I find more uses, better ways to use this appliance, or if my opinion changes.
I hope this review is helpful for you.
**Review update on 10/6/24, I've been using this daily. Still no leaks or issues and I've experimented with different English muffins and different meats etc and its made the sandwich perfectly each time. I do recommended toasting the English muffins first before putting them in this machine. But it will make it regardless it's just a matter of preference on how toasted you want the muffin. ***
The dual sandwich feature is a lifesaver, especially when we're both rushing to start our day or when we're feeling particularly famished. It's amazing how we can each customize our sandwiches exactly how we like them. I often go for a protein-packed option, while my wife prefers something on the lighter, low-carb side. The complimentary recipe book that came with it has been a fantastic source of inspiration, pushing us to experiment with different ingredients and flavors, making every breakfast unique and exciting.
Clean-up is a breeze, thanks to the dishwasher-safe removable parts. It's such a relief not to have to worry about a messy kitchen first thing in the morning. This appliance not only saves us time but also ensures we start our day with a delicious, nutritious meal. No more settling for bland, on-the-go breakfasts or worse, skipping breakfast altogether.
Giving this breakfast sandwich maker as a gift has crossed our minds more than once, considering how much joy it has brought us. It's perfect for just about anyone who appreciates the value of a good breakfast but might be short on time or culinary skills.
In conclusion, the Hamilton Beach Breakfast Sandwich Maker has been a game-changer for our mornings. It's hard to imagine starting our day without it now. Highly recommend to anyone looking to spice up their breakfast routine with minimum fuss and maximum flavor!
Update 3/24/2004
Here are some tips to mimic the restaurant with the M and the Arches or the chicken restaurant that closes on Sunday.
1. Start by taking your English muffin and split it apart and then place the pieces face down and toast the insides for about 5 minutes (this will vary on the brand you buy, due to the moisture content). Place the on the bottom burner inside the bottom rings and close the top during the 5 minutes.
1a. Do this for all of your muffins in a preparatory state and set them aside.
1b. DO NOT TOAST THE BOTTOMS - only toast the insides, because the top and the bottom will be toasted during the cooking process.
2. Now proceed to cook the sandwich. Placed your pre-toasted muffins in the holders. Bottom tray with your meat/cheese. Upper holder with your egg and close the lid. (To help stop the egg from seeping out, make sure to put the swing-out plate all the way over into the holder prior to pouring your whole egg or egg white (ONLY USE REAL EGG - don't use egg mixture. DO NOT PUT THE TOP PART OF THE MUFFIN IN JUST YET.
2a. You don't need to lightly coat the unit when you are prepping your muffins, but when you are cooking the egg, it is best to coat the top ring and the swing out plate with oil/butter to help remove the egg. I wiped mine with a wet cloth, so I coat them each time. If you just wipe with a dry cloth or paper towel, you may not have to coach it each time and you will have to periodically judge when you need to recoat.
2b. Make sure your meat is pre-cooked
3. I found that with either one egg or two five minutes on the timer works best.
4. When the timer is up, NOW PUT THE TOP MUFFIN on top of the cooked egg and cook for 1 minute.
4a. Place some margarine/butter on top muffin's inside after the minute is up.
Even though, the prep adds some time, unless you pre do all of your muffins and keep in the freezer (make sure to bring to room temperature if you freeze the toasted muffin or you will have defeated all of your work).
These steps help to give a consistently good sandwich and a sandwich that is not soggy.
Use non metal utensils to help save the nonstick coating.
If you use a whole egg, take non-metal utensil and pierce the yolk(s)
Good luck and happy cooking
If I were to make an improvement, it would be to include an auto shut off. You need to be attentive to prevent an issue, but since I am usually hungry as a bear in the morning, I am drooling as I wait to hear that beep-beep saying it's breakfast time!!
This is an inexpensive alternative to a drive-thru and will require as much time out of your day as waiting in line. Plus, you can make your coffee, or whatever you do, while you wait. unlike sitting in your car listening to traffic reports. LOL.
Bottom line, if you are here, you want a way to make an easy breakfast. This is it, if you want an egg based sandwich. Dead short technology has been around way too long for there to be issues related to electrical reliability. I believe user care and the design which eliminates the potential to contaminate the circuitry from normal use is far more important than brand name on such a basic appliance. I wrote this review because I would buy it again for the same price, even if it fails within a few years. Why? Because it would most likely be my fault if it fails. For the small price compared to the drive -thru alternative, my break even is less than 10 trips to the clown show.
UPDATE 11/2025
I have been enjoying this sandwich maker for a long time now, and I still find it to be as good today as the first day I used it. I mentioned above, that this brand leaves some questions, but at this point, it is a slam dunk. I have never had a problem with it, it has performed flawlessly, it is a great value and I just love it.
Initially, I figured there were enough videos out there to explain all the features and functions, but after some time, I have learned a few things to share with all of you.
Mainly, the incorporation of a wi-fi enabled outlet as shown in my video is a great way to ad a timer/switch to my/your routine. I set the outlet for 8-10 minutes, depending on what is in my sandwich, and initiate that process 10 minutes or so from the time I want to eat my breakfast. I prepare all of it the night before, usually with a frozen sausage patty to keep things cool overnight. I get up and go through my routine, and by the time it's all said and done, I am showered, have my coffee in hand, and my breakfast ready to go. This is such a time saver, and very reliable, that I have put a lot of effort into this review for your convenience and understanding, so you too, may enjoy such a wonderful appliance. I hope my pics and video helped you to undderstand in real life, what you are shopping for😀 I am very happy with this product and highly recommend it 😎
I sure hope you found this a help. Thanks👍🏼
The size of this is really nice. It looks a lot bigger in the pictures, but it is a nice compact size so it won't take up much room on a shelf or in a pantry. Super easy to clean up.
Anyway, I'm very happy with this double sandwich maker. I use it most days. Sometimes as a single, left or right doesn't matter, but usually as a double. I use four minutes either way and the egg(s) come out tender and without sticking. Although, I would prefer a runny yolk, I guess it's less messy to eat with a set yolk. And I appreciate that the whites are not rubbery. I may try shorter timing to see how the egg(s) fair?
I've found from watching video reviews and through my own use, that using butter flavored cooking spray on all cooking surfaces once preheated, and waiting to add any cheese till after cooking makes for easy wipe down later when the unit has cooled. Every thing is plenty hot enough once removed to a plate, that the cheese melts readily wherever you place it inside. I like the Thomas Light Muti-grain English Muffins with it and they have eight grams of fiber each. Also, if you can find mini blueberry bagels, they make for an interesting flavor combination. I use large eggs and I don’t break the yolk. This does make for a slightly lopsided sandwich but gives a burst of just set yolk flavor. If you have a thin muffin top, two large eggs work per sandwich, still at four minutes. I use precooked frozen turkey sausage patties, thawed overnight in the refrigerator. Sometimes, I'll use two patties per sandwich by placing one on the muffin bottom and one in the top section, then cracking the egg on it, breaking the yolk, adding the muffin top and again, four minutes. Two patties stacked together in the bottom section is too thick.
Tips. I started with frozen pre-cooked patties but have switched to pre-formed patties that are fresh. I cook those in a skillet and season to my liking. I found the pre-cooked frozen ones were a bit small and the fresh ones are wider and fill the muffin. Also, as much as I like the name brand muffins... the store brand ones are more uniform, the tops and bottoms are the same width. This really helps when you put the top piece in with the egg. Oh... and I tried one where the cheese was between the sausage and egg... don't do that. lol. Nothing catastrophic, but it made the sandwich slippery. I'd bite into it and the pieces would all move. With the cheese on the bread, everything stays in place. Also, keep a towel or pot holder nearby, the unit has spots that can get quite hot. I mean... it's cooking your egg and toasting your bread. So, yeah... be careful with touching bare skin to it and don't try cleaning it until it's cooled down. OH!! and I really like how fool proof that is. They made the left and right side almost fool proof. The hinge areas are specific to left and right sides. You can't screw up which cup goes on which side unless you turn them upside down. But you'll notice quite quickly that you've made an error and flip things around. This is so that you can slide the egg tray out of the cup, without obstruction, to complete the sandwich. If you had the ability to put either cup on either side, you'd pivot into the other cup. No good. So, they designed the guess work out for everyone. The left side slider opens left and the right side opens right. Nothing to it.
So I watched YouTube videos of people using this little egg sandwich maker and bought a Kindle book with recipes. So much advice from so many people! All say “It takes trial and error to find out what you like.” So I thought I’d just ruin something to take this tidy little machine on a maiden voyage. I brushed a thin layer of olive oil on the rings and griddle parts before I cooked my first sandwich. We haven’t bought muffins or bagels yet, but I did buy a set of stainless steel cookie cutters that has a 4” ring in the set so I can cut bread or tortilla or other circles. But when the cooker came, I was too excited even to fool with that. I cut a piece of that wide rye bread with the rounded edges in half to make one sandwich, fully expecting leakage because the bread didn’t extend to the edges of the rings. Put in the bread half, a slice of ham, a slice of cheese; closed down the top ring and cracked in an egg, using an edge of the shell to break the yolk. (I am confused why Hamilton Beach’s instructions say to prick the yolk with a fork, but then says not to use metal utensils because they’ll damage the non-stick coating.) Following advice from others, I didn’t put the top piece of bread on the raw egg until the last minute or so—they say it keeps the bread from having egg soaked into it—but that was probably unnecessary and prevented the top piece of bread from being as toasty as the bottom one.
Initial impression: Easy. Tasty. This thing is forgiving as long as you remember to use oven mitts and give your cooked sandwich time to cool down some—especially if you cook it a little too long, as I did. Also, next time I make TWO of these, I’m going to scramble one egg and mix in a few veggies fritata-like, divide it between the two top sandwich rings, then put the cheese on top before putting on the bread instead of putting it in the bottom ring. Or maybe put half a cheese slice on the bottom and half on top. The book I bought with egg sandwich maker recipes does the cheese on top of the egg, and I think that’s a good plan to keep egg out of the bread while ensuring the top and bottom pieces cook evenly.
People are nothing but creative with this egg sandwich maker. Just search for Hamilton Beach egg maker on YouTube. My mother used to make a marvelous enchilada casserole she got out of some 1950s magazine: four lightly turned-in-oil corn tortillas in a layer, a layer of chopped onion, a layer of sharp grated cheddar cheese; repeat for two more layers; then top it all off with a can of Hormel or Old El Paso chili without beans and more cheese. I’m going to try adapting that recipe to this egg cooker to make little dinner enchiladas for the two of us. The worst that will happen is that it will make a mess and it won’t cook quite right, but I’m game to experiment. Now I just have to try to wean Robert off his Jimmy Deans, which always seem to be sold out…and he ought to be able to manage it with this cooker.
UPDATE: I use this almost every day. Street taco sized tortillas work great in it, the corn ones less well than the flour. The La Banderita flour tortillas curl up the sides a bit and cook to a satisfying crunchiness with sides that help keep the ingredients from sliding around. I make two with real bacon bits and cheese and an egg on top of each, then flip one over on top of the other for a perfect two-egg sandwich. I'm still experimenting with how best to time cooking the eggs so they're not overdone and rubbery, but this little appliance is great!
We have had it for six weeks now and use it every other day. I have made sandwiches for my wife and I using English muffins, biscuits or pancakes. I use either Canadian bacon or sausage patties with Colby Jack, Swiss or American cheese. TIPS: Although the finish is non-stick apply a light coat of cooking spray to the upper and lower plates as well as the rings an the egg tray then gently wide the cooking oil with a dry paper towel to spread it around more evenly. Only use silicone utensils like a spatula with this product so that you don't accidently scratch the surface. Never use anything metal. Make sure the green light is on before you start making the sandwich. When making the sandwiches cut the cheese to fit the lower bun and place the meat on the cheese before putting the lower part of the sandwich in the bottom ring. Lower the upper ring and make sure the egg trays are completely slid in place before putting an egg in each ring. Make sure the upper heat plate for the egg is level or the egg will tend to run to one side.
Use a toothpick to break the yokes so that that are runny. Set the timer for 3 minutes then salt and pepper before lowering the lid. Use a little Cajun southern seasoning if you want to kick start the morning. When the timer goes off lift the lid and place the top bun on the egg. Close the lid and set the timer for two minutes. Unplug the sandwich maker and remove the sandwich as soon as the second timer goes off. The unit does not turn off by it's self. Let the unit cool then use a barely damp dish cloth to wipe the inside of the unit clean. Then use a barely damp paper towel to rinse all the parts. We haven't had issues with things sticking to the surface. I recently bought a second one so that we can keep on at our beach condo. Frozen sandwiches now taste like cardboard compared to the sandwiches I can make with this sandwich maker and it only takes two more minutes to make the sandwich as compared to heating up a frozen sandwich in the microwave.